Showing posts with label step-by-step. Show all posts

Sitting Santa


Make this charming Santa to decorate for the holidays.  Quick and easy craft suitable for beginners.

Materials needed:  Air-dry clay in white, flesh, red & brown or black for boots.   Optional black seed beads for eyes.

Candy Cane Santa


Materials needed:  Air-dry clay in white, flesh, red & green.  Blush for cheeks.  Optional black seed beads for eyes.

Create pieces as shown in diagram below.

Make this cute owl


Make this cute owl from your favorite air dry clay.  Easy to make...great for beginners (kid-friendly)....just follow these step-by-step photos (from the "Cake Duchess").  If you have any trouble with the clay notsticking to itself,

Snoopy


Everyone's favorite cartoon dog Snoopy!  Easy to make...great for beginners (kid-friendly)....just follow these step-by-step photos (from an Asian website).  If you

Floral Week: Tulip Tutorial

How to make vases with air dry clay


Make decorative vases with air dry clay following this tutorial from "Craft & Creativity".  These lovely vases with stamped designs start out as a slab of clay flattened with roller (or pasta machine).  Cooking oil is used as a release agent when forming clay around glass.  

Be My Valentine


Gloriann Irizarry (byglori.com) says: lets celebrate Valentine's Day   "....with a special Be Mine Valentine 3D wall art canvas.   Using my Black cat Romeo has an inspiration I created this OOAK Be Mine Card in a canvas using the Creative Paperclay to sculpted 3D and make it literally pop out of the canvas."  Click here for step by step photo tutorial.

Easter Bunny Tutorial


Step by step photo demo to make this Balancing Bunny cake topper from Rouvelee's Creations. Uses Styrofoam balls for body armature and Styrofoam eggs covered in clay.  Fondant was used here but cold porcelain or any of the softer types of air dry clay would be suitable.


Make a Ballerina Doll


Clay used in this tutorial is a soft air-dry clay such as Makin's Clay, Deco Clay or Cold Porcelain.  Some white, a small amount that's been tinted pink, and a larger quantity tinted flesh.
  1. Cut a strip of pink clay for bodice.  Tool shown is a fondant cutting and embossing tool with changeable blades for creating different textures.  It's inexpensive and works well with the soft clay.
  2. Use circle cutter to cut white circle.  This will be undergarment.
  3. For head, wrap a foam ball with flesh clay, starting with a ball of clay about same size as foam ball. 
  4. For torso, wrap a foam ball with flesh clay, starting with a ball of clay about twice the size as foam ball and shaping clay into a teardrop shape.
  5. Roll 2 flesh colored logs for legs.  Set aside to dry until needed.
  6. Wrap white circle cut in step 2 around bottom of torso and add texture.
  7. Roll 2 more flesh colored logs for arms.  Flatten ends for hand and use scissors to cut a notch that will create thumb.  Set aside to dry until needed.
  8. Attach legs to body in sitting position.  Use white glue if needed to hold in place.  
  9. Wrap pink bodice made in step 1 around top of torso.
  10. Make shoes from pink and white as shown in photo and attach to leg.  Strengthen joint with piece of toothpick and a little glue.
  11. Make a tutu from pink fabric and wrap around torso.  Stitch to hold secure.
  12. Attach head.   Strengthen joint with piece of toothpick and a little glue.
  13. Attach arms.  
  14. Let doll dry and cure until OK to handle without damage.
  15. Glue yarn or string onto head.   Trim for cute hairdo.
  16. Make a bow from clay and glue to top of head.
  17. Use acrylics to paint eyes, lashes and mouth.   Use powder to blush the cheeks.
  18. Use a dot tool and white acrylic paint to place dots in eyes, on cheeks and all over bow and bodice and you're done!

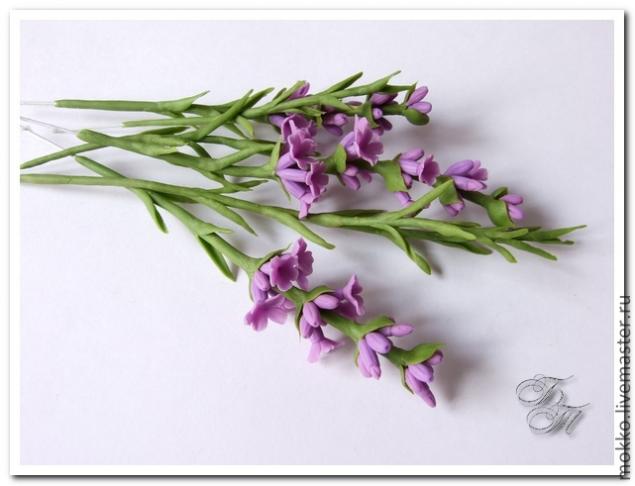
Craft Some Lavender Sprigs with Air Dry Clay


Tatiana (aka) Mokko has prepared a great step by step tutorial at the Russian site 'Fair Masters" for making lavender from air dry clay.   Because computer translations are notoriously full of errors, especially when it comes to crafting terminology, I've provided an English interpretation below for your convenience.   If you'd rather work from the original, click here.   (Note: When computer translates page, it calls this a polymer clay project, however, no-bake, air dry clay is the medium used in demo.)

These lavender flowers could be made life size or in miniature.
No shape cutters needed for this project, just clay, wire, PVA (white) glue and scissors.  Lavender and green paint needed to pre-tint clay unless you have purchased colored clay.