
 |
| papier mache stage complete |
In this multi-part art doll demonstration, Olga Egupets shows us her technique from start to finish, demonstrating armatures, modeling faces, body parts and props, painting, wigging and creating clothing. When making her dolls, Olga uses a variety of materials, including air dry clays such as Creative Paperclay, LaDoll, Plastiform, Efaplast etc.
This is Part 3 of 7. Please go here for Parts 1 and 2 if you haven't been there already! In Parts 1 and 2 Olga created her armature and body form, finishing it with a layer of papier mache (as shown above). Now that the papier mache has cured, she continues her demonstration with sculpting and forming the doll's facial features using LaDoll air-dry clay. At this stage she also creates the hands and feet (with more LaDoll), shaping lower portion of wire frame into 'spokes' for embedding into the display base and attaching feet to the "spokes".
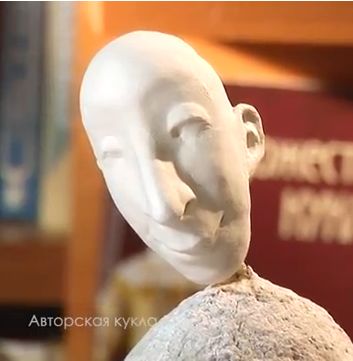 |
| Completed face sculpting |
Lastly she coats the entire body with a finishing material and attaches the arms. I'm not certain what product she is using for this coating. It's an air-dry product that looks like plaster. It could be "Plastiform", which is a powdered modeling material made with wood and cellulose that comes in a large plastic bag (I've never used it myself.) It is mixed with water until fibers are dissolved and a soft paste is formed. Dries hard as ceramic and can be sanded when dry. If anyone is familiar with Plastiform (& where we can find it in USA) or knows exactly what material Olga might be using for her coating, please tell us about it in the comments section below.
These videos are in Russian but are easy to follow without the narration. A "captions" feature is available for each video for those that don't speak Russian. If you want to view the captions, mute the sound and then click on (CC) for "Captions". First, click OK for Russian to get it started and then select TRANSLATE, scroll to select your language. The captions are helpful but, like all computerized translations, expect to find a number of errors. (Note: Sorry, I didn't realize...Translate Captions appears to only be available if the video is embedded full size...I am correcting this and CC should be there now.)
IMPORTANT NOTE: The arms are placed in position to work on them but are NOT glued in place. It is much easier to dress doll and do the finishing touches if arms can be removed. Glue in place AFTER dressing.
 |
| Stage 3 complete! |
"500 Handmade Dolls" is a great inspirational book
for any art doll artist or collector! I cherish my copy!
Just read the reviews at Amazon and you'll see what I mean.
As one reviewer put it "A phantasmagoric display!"
Steps to Creating an Art Doll, Olga style
Part 3: YOU ARE HERE
Part 6: Making the Clothes
Part 7: Creating Wig and Finishing
Excelente trabajo, me encanta trabajar con Papel Maché
ReplyDelete