
Paperclay doll by Oksana Dyachenko
Excellent, detailed tutorial for creating a mixed media art doll by Oksana Dyachenko. Some interesting and unique techniques shown that I've never seen before. Creative Paperclay is used to sculpt head, hands and feet with abundant step-by-step instructions for modeling face and hands along with painting details. This is a very long tutorial with lots of steps and lots of photos. You'll probably do best if you follow along one step at a time. Don't skip around ....you might miss something important. There's really a lot of information in this tutorial!
This 6-part tutorial was written in Russian by Oksana and links for each step of the tutorial are shown under each of the photos below. The links go to a page that has been translated to English by Google. Please read over the information I've added below. Due to odd and missing words resulting from the computer-generated translation, I know you'll have some questions. I've done my best to fill the gaps and interpret some of the steps that are a bit confusing If you have any problems understanding the somewhat flawed computerized translation, please leave comments here and I'll do my best to help. If you would like to see page in original language (or translate to another language), click on the Russian links provided for each step.
Note: All links open in a new window so you can have quick access back to each step listed on this page!

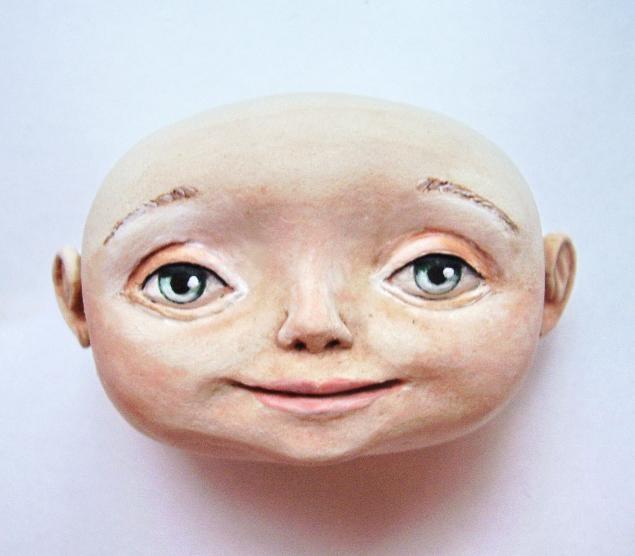
The paragraph in section 18 is particularly confusing in it's translation. What she is saying is that the eyes are set in the approximate middle of the head. In an adult, eyes are actually a little higher but we're trying to accomplish a cute, childish or cartoonish appearance, so eyes are set low in the head...in middle. The distance between two eyes is typically equal to the width of one eye. The total width of head is 5 eyes wide. Imagine 5 eyes in a row across face and your proportions should work good.
She is also using a technique that creates a hollow head. Oksana prefers to make head hollow, which allows the head to be turned, but says that it's not necessary if you're not interested in pulling the "stuffing" out of skull. To make it hollow or solid is an option. If you prefer to make a solid head, just leave an indentation to insert neck later. In the final step, the head just sits on the neck and is not attached. This is an art doll that is decorative only, so author felt attaching head was not needed and wanted the option to move head positions to add expression.
In the hollow head method, the purpose of wadding up tissue inside the ball of aluminum foil she uses to form skull is to make it easier to pull the foil and tissue thru neck hole after clay is cured. An alternative method of removing material from inside skull is to cut top of skull off (in back of hairline at top of head and behind ears). Once the insides are removed, the 2 skull pieces are stuck back together, patching skull with more Paperclay. Most of this 'scar' will be hidden by hair anyway.
Let head dry before moving to next step.
Note: Read viewer comments on each page to gather many additional tips and maybe answer some of your own questions.
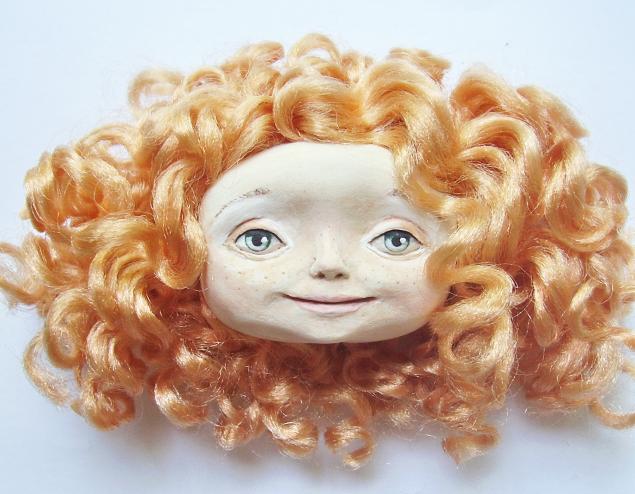
For hair, the author recommends novelty yarns, loose tape, goat skin, and any other choice of material.
The last curls applied that are framing the face, are folded in half so there was no visible cut.

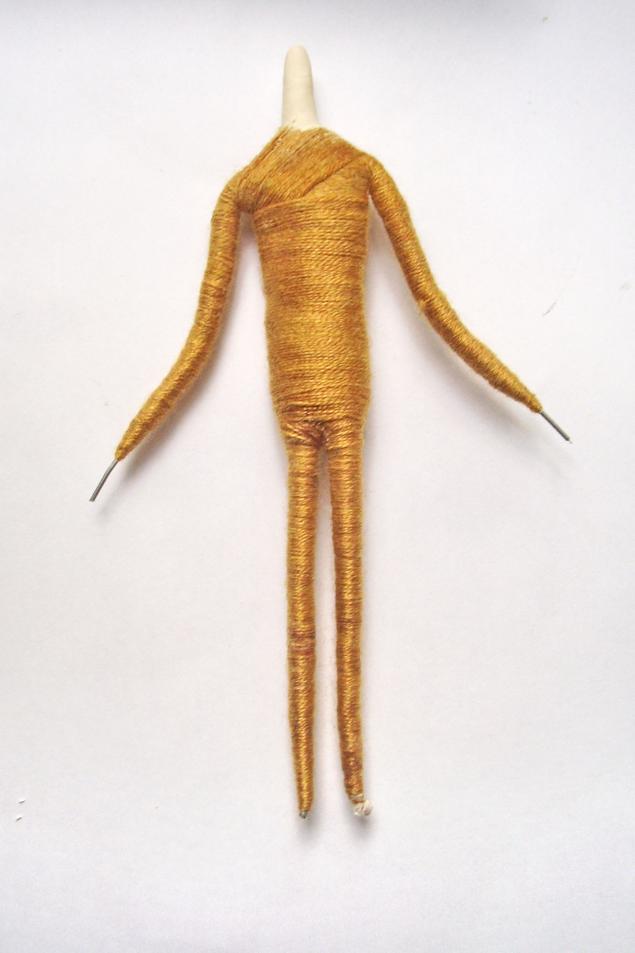
The body armature shown in Step 4 is for a simply-shaped art doll that will be permanently dressed. As an option, you could make the slightly more complicated armature that is posted here, which is suited to a more detailed, fully-shaped figure. Note, the neck is made extra long to fit in the removable, hollow head.
For painting the face, Oksana suggests oil, acrylic, watercolor, tempera, watercolor pencils, etc....choice of paint is yours.
Author uses cold tea or coffee to tint the skin tone. She warns against keeping your doll head in the solution no more than 5 seconds or the clay may begin to dissolve. If desired color is not achieved at first, the operation of "diving in a solution of tea" can be repeated.
For hair, the author recommends novelty yarns, loose tape, goat skin, and any other choice of material.
The last curls applied that are framing the face, are folded in half so there was no visible cut.
The body armature shown in Step 4 is for a simply-shaped art doll that will be permanently dressed. As an option, you could make the slightly more complicated armature that is posted here, which is suited to a more detailed, fully-shaped figure. Note, the neck is made extra long to fit in the removable, hollow head.
For holding the wire joints of the armature together you will need some strong tape such as duct tape. Floral tape could possibly work. You will also need some 2.5 mm armature wire, adhesive, sewing thread and toilet paper. The toilet paper is used to pad and bulk-up the body and the thread is used to hold it in place.
You will also need some decorative yarn to wrap the entire body. The yarn on arms and legs will remain exposed as leggings and sleeves for the doll's outfit. It looks like author is using baby-weight yarn or crochet thread. The material chosen for wrapping would depend a lot on the size of doll you are making. The smaller the doll, the finer the yarn. You could also choose ribbon or another material to wrap with.
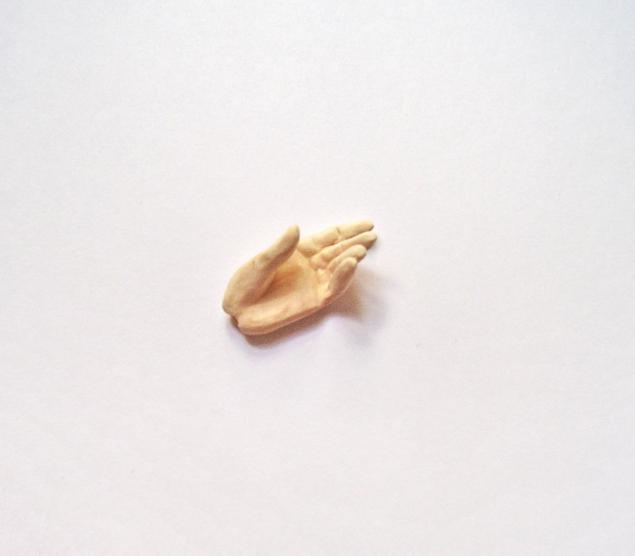
Oksana sculpts hands in separate pieces for fingers and palm and demonstrates her method using many photos. She considers this a very simplistic way to model hands but quite suitable for art dolls. The computer translation made be hard to follow but the numerous photos clearly show what she's doing! Some very nice looking hands result from her unconventional method.
The word "stacks" refers to her modeling tools (which are dental tools). There's a bad translation there somewhere.
Before you begin, let me highlight an important point about proportion that author mentions: The length of the hand is the same measurement as from the tip of the chin to the middle of the forehead. The dolls can usually handle less.
Author cautions that the small, slender fingers means the clay dries out quickly. Try to work hands at a fairly rapid pace. You can let the fingers of one hand dry while working on the other hand and then attach fresh clay for palms to the cured fingers.
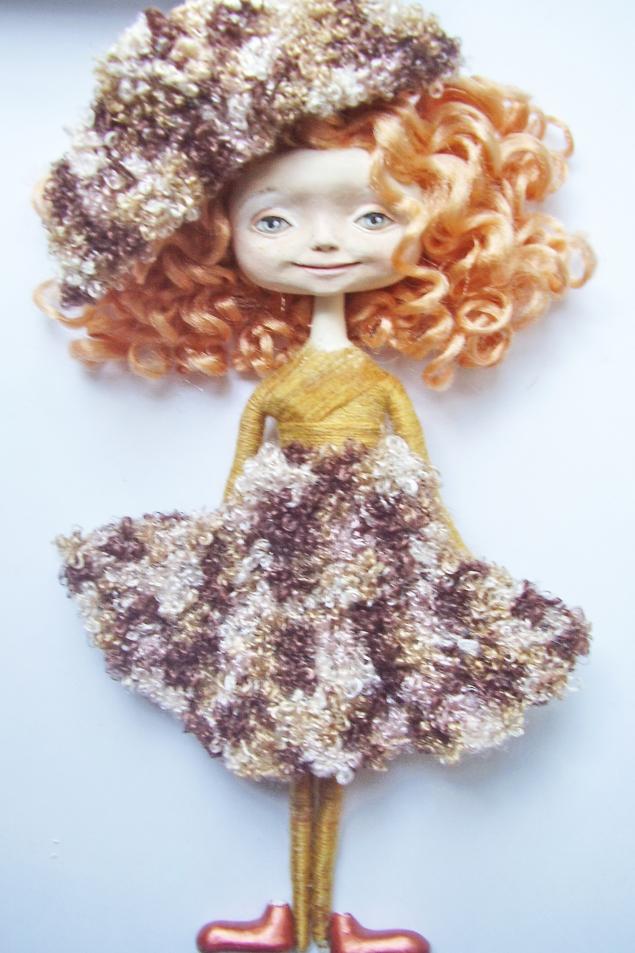
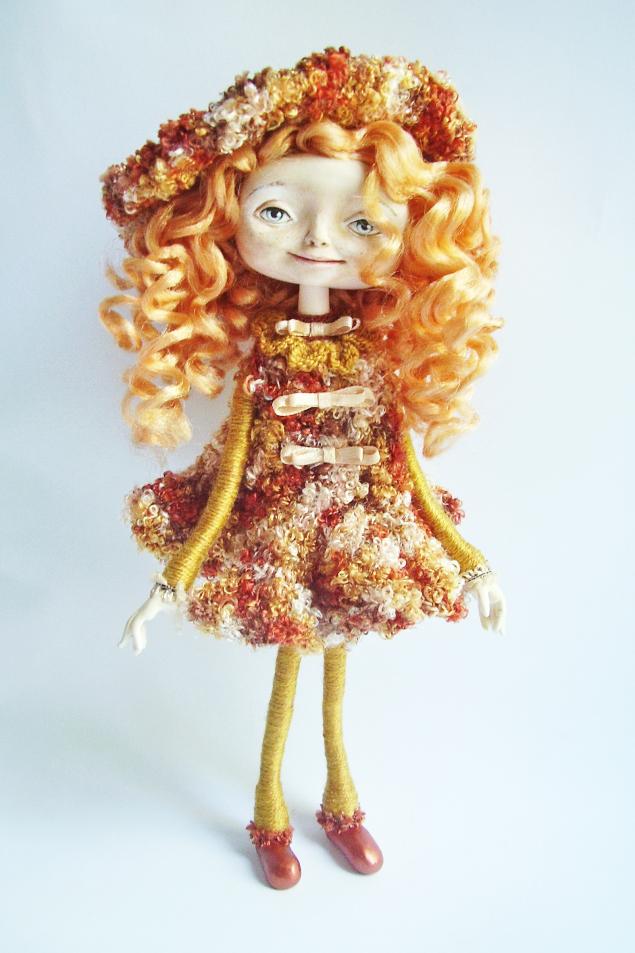
The photo above shows one of the dress, hat and shoe options made by Oksana. She likes to knit and crochet the outfits for her art dolls, but, of course, knit dress is optional and you can sew a dress or just glue one on.
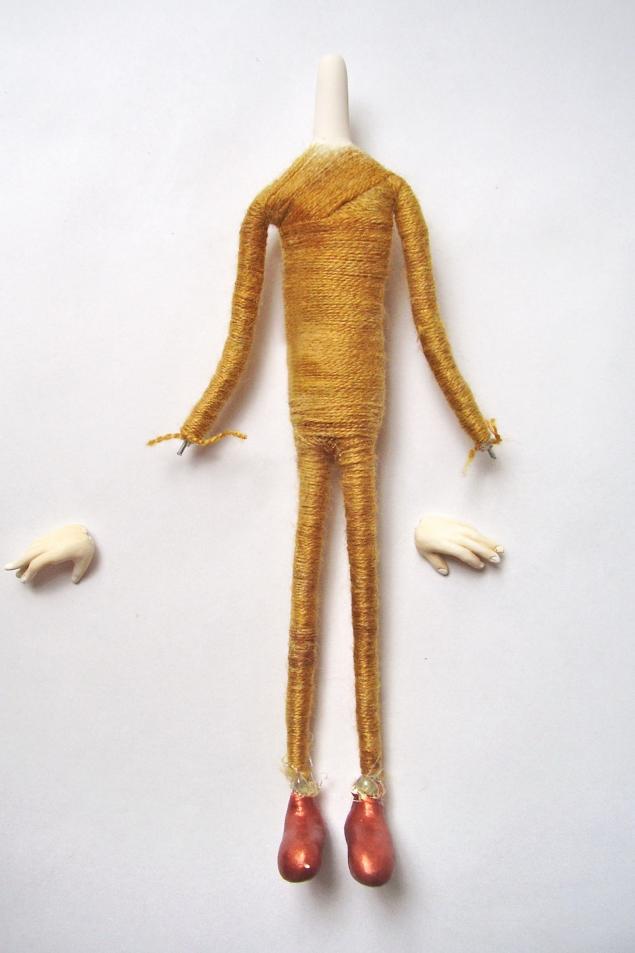
Compare hands and shoes to the body and adjust length of limbs if necessary by using wire cutters. Watch your proportions and do not let arms look too long in contrast to the legs.
Oksana fastens the limbs to body with glue gun ("hot glue").
Oksana uses more of her yarn to close and cover any ugly junctions with the neck, wrists and ankles, making sure the ends are neatly glued and hidden.
The doll head just sits on the neck. Inserted carefully, adjusting the size of the hole in the head to the parameters of the neck. Oksana says a removable head has the ability to turn her head but there's a real chance to lose your head if you turn the doll upside down. ;-)
But she also says her art dolls are not playthings, so shouldn't be handled much. Their purpose is to decorate a room and uplift your spirit. She says her girls stand or sit on the shelves with family photos or sit on the edge of the flower pots. The finished doll in her knitted outfit is shown below.

In the process of wrapping the body, use a clear glue to hold in place. Tightly wrap the arms and legs in 2 to 3 layers (up, down, and up again) so no gaps are left anywhere. Then wrap the rest of body.
Oksana sculpts hands in separate pieces for fingers and palm and demonstrates her method using many photos. She considers this a very simplistic way to model hands but quite suitable for art dolls. The computer translation made be hard to follow but the numerous photos clearly show what she's doing! Some very nice looking hands result from her unconventional method.
The word "stacks" refers to her modeling tools (which are dental tools). There's a bad translation there somewhere.
Before you begin, let me highlight an important point about proportion that author mentions: The length of the hand is the same measurement as from the tip of the chin to the middle of the forehead. The dolls can usually handle less.
Author cautions that the small, slender fingers means the clay dries out quickly. Try to work hands at a fairly rapid pace. You can let the fingers of one hand dry while working on the other hand and then attach fresh clay for palms to the cured fingers.
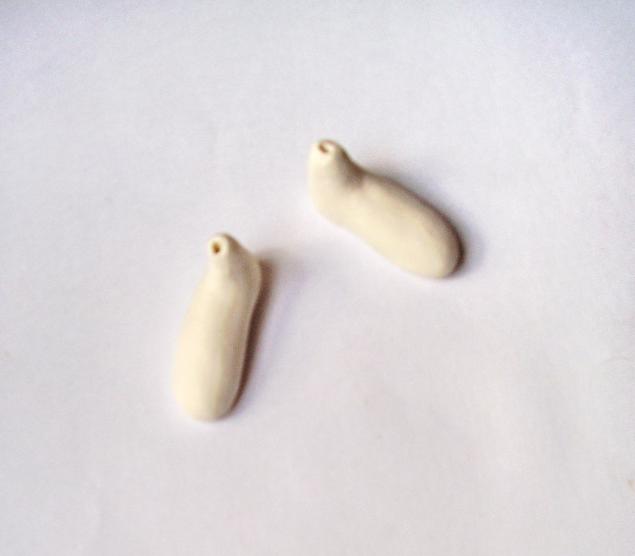
No explanation is given for modeling the shoes, but they are simple, self-explanatory oval shapes with high tops and a hole to insert leg. Both hands and shoes should be allowed to dry before next step.
Oksana fastens the limbs to body with glue gun ("hot glue").
Oksana uses more of her yarn to close and cover any ugly junctions with the neck, wrists and ankles, making sure the ends are neatly glued and hidden.
The doll head just sits on the neck. Inserted carefully, adjusting the size of the hole in the head to the parameters of the neck. Oksana says a removable head has the ability to turn her head but there's a real chance to lose your head if you turn the doll upside down. ;-)
But she also says her art dolls are not playthings, so shouldn't be handled much. Their purpose is to decorate a room and uplift your spirit. She says her girls stand or sit on the shelves with family photos or sit on the edge of the flower pots. The finished doll in her knitted outfit is shown below.
Wonderful tutorial!
ReplyDeletehttp://incantodifata.blogspot.it/
ReplyDeletethis is my blog, visit it if you want...I'm always glad to meet so good artists like you!
This doll is so cute...I wanna try!
Thanx for the tutorial
kisses
Annalisa
Thank you Coleen, I just saw your stuffing tutorial on youTube, it was really good. I especially liked your demonstration of using the stuffing forks for the fingers. I've used them, but I now have a better understanding.
ReplyDeletePreciosa
ReplyDeleteque bonita muñeca!! me encantará hacerla! y el tutorial es genial! muchas gracias!
ReplyDeletepondré tu muñeca en mi web: https://www.dalareiradolls.com
I love the unique techniques shown in this tutorial.
ReplyDelete