

Olga E. Egupets was born in Deep Eastern Kazakhstan. In 2000, she decided to try making dolls and soon became very popular among collectors and lovers of art dolls, both in Russia and abroad. At first it was small size works but her current dolls are quite large. In this multi-part demonstration, Olga shows us her technique from start to finish,
demonstrating armatures, modeling faces, body parts and props, painting, wigging and creating clothing. When making her dolls, Olga uses a variety of materials, including air dry clays such as Creative Paperclay, LaDoll, Plastiform, Efaplast etc.
These videos are in Russian but are easy to follow without the narration. A new "captions" feature is available for each video for those that don't speak Russian. If you want the captions, mute the sound and then click on "Captions" (CC). First, click OK for Russian to get it started and then select TRANSLATE, scroll to select your language. The captions are helpful but, like all computerized translations, expect to find a number of errors. (Note: Sorry, I didn't realize...Translate Captions appears to only be available if the video is embedded full size...I am correcting this and CC should be there now.)
Parts 1 and 2: Designing the doll, forming the armature, sculpting and refining the body shape.
In the first video, Olga begins her televised master class on making a doll that is posed with her sewing machine and has just sewn herself a new dress. Finished doll shown below. In this edition of the program, Olga will draw a sketch, construct a frame and begin filling in the armature with sculpting foam, using body sculpting techniques familiar to a puppet master.
I'm not sure what type of sculpting foam she is using but there's lots of options for this step. Olga is probably using the type of foam often used to construct large puppets. You could use fiberfill batting instead, or carve some dense Styrofoam. Upholstory foam (urethane) could also be used. You're creative...you'll think of something!
In the second video, Olga refines the foam body shape, wrapping with string to secure it and to help the papier mache adhere. First she coats body with an adhesive and then covers everything with papier mache. Looks like her homemade papier mache is made from paper towels, water & wallpaper paste (I'm just guessing at this). Celluclay instant mache could be used instead. Olga also creates a separate armature for the arms and hands,
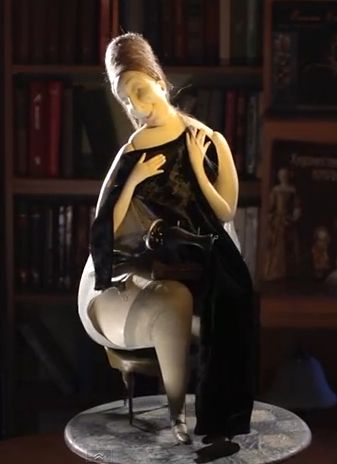 |
| Finished doll holding her new dress (with sewing machine on lap) |
Steps to Creating an Art Doll, Olga style
Parts 1 and 2: YOU ARE HEREPart 3: Sculpting face, hands and feet.
Part 4: Painting with acrylics, powders and pastel pencils.
Part 5: Making the Props (stool, sewing machine)
Part 6: Making the Clothes
Olga is an incredible artist. Her dolls are very soft and her technique is accessible to everyone who wants to start a project.
ReplyDeleteI love :)
Hello, I am very impressed by your work, it is beautiful. I would like to know what product you use for finishing after the paper maché and before painting. Is it a plaster, if so, what is the name of this product? I am writing from France. Thank you
ReplyDeletePatricia
Thank you, but I cannot take credit for this doll. The artist is Olga Egupets. In part 4 of this tutorial she says "After everything has air-dried, she coats entire doll with a matte spray varnish for protection." I don't believe there is a need for sealant between the paper mache and painting. I paint with acrylics directly on air dried clay or dried mache.
Delete